With technological advances, there are more ways to customize your mug than ever. You can add designs, text, and photos to make a personalized mug perfect for you. In this tutorial, we will show you how to use Cricut infusible ink to make a mug with a custom design.
This ink becomes part of the material of the mug and will not wash off or fade over time. So whether you are looking for a unique gift for someone special or just want a new coffee mug that is all your own, follow these steps to create a one-of-a-kind mug using Cricut infusible ink!
What is a Cricut infusible ink?
Cricut Infusible Ink is a unique type of ink that bonds with the material of your mug to create a permanent design. It means that your design will not wash off or fade over time, making it perfect for creating a long-lasting and unique gift. Infusible ink is also heat-resistant so that you can put your mug in the microwave or dishwasher without worry.
To use Cricut infusible ink, you will need a special transfer sheet designed for this type of ink. The transfer sheet has a heat-activated adhesive that bonds with the material of your mug when heated. It allows the design from the transfer sheet to be transferred onto your mug.

What you need to make a mug with a design
- Cricut Infusible Ink Transfer Sheet.
- Laser Printer.
- Cricut Cutting Machine.
- Mug.
- Oven or iron.
Step 1: Create your design
The first step is to create your design. Then, you can use the Cricut Design Space software to create a custom design or choose from one of the many already available designs. Once you have your design ready, print it onto the infusible ink transfer paper according to the package instructions.
Step 2: Cut out your design
After your design is printed, cut out the individual pieces you want to transfer, and make sure the design is placed where you want it on the mug because it’s impossible to reposition the design once it’s been transferred. Don’t forget to leave a small border around each piece.
Step 3: Transfer your design onto the mug
Preheat your oven to 400 degrees Fahrenheit. Then, place your mug upside down on the transfer sheet and align it with the design. Make sure there are no gaps or air bubbles between the mug and the transfer sheet.
Step 4: Bake in the oven or iron the design
Place the entire sheet in the oven and bake for 60 seconds. After 60 seconds, remove the mug from the oven and let it cool. Once it’s cooled, peel back the transfer sheet to reveal your design!
When using iron, preheat it to the hottest setting, nearly 350 degrees Fahrenheit. Then, place your design face down onto the mug and cover it with a piece of parchment paper.
Press the iron onto the parchment paper, applying even pressure. Next, slowly move the iron over the parchment paper, applying firm pressure for about 30 – 60 seconds. You’ll know the design is transferred when you peel away the parchment paper and see that the design has transferred onto the mug.
If any areas didn’t transfer, place the parchment paper back down and press the iron on those areas for a few more seconds. Remove the parchment paper and allow the mug to cool completely before using it. Your design should now be permanently transferred onto the mug!

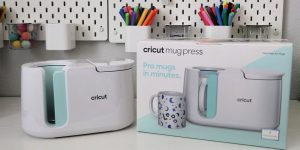
How to use a Cricut mug press?
You can use the best mug presses if you want an even easier way to make a mug with a custom design. This machine presses infusible ink transfers onto mugs in seconds, making it the perfect tool for busy crafters.
To use the Cricut mug press
- Start by preheating the machine.
- Place your mug upside down on the transfer sheet and align it with the design.
- Make sure there are no gaps or air bubbles between the mug and the transfer sheet.
- Next, load the transfer sheet into the machine and press start. The Mug Press will do the rest, heating up to 400 degrees Fahrenheit and pressing your design onto the mug in 60 seconds.
- Once the design is transferred, let the mug cool before peeling back the transfer sheet. Your custom mug is now ready to use!.
Important notes about the Cricut mug press
- You can only use the Cricut mug press with Cricut infusible ink transfer sheets. If you try to use a regular vinyl transfer, it will not work.
- You can use it only with ceramic mugs. It will not work with glass or metal mugs.
- Be sure to follow the package instructions for the Cricut infusible ink transfer sheets. If you don’t preheat the mug, the design will not transfer correctly.
- The Cricut mug press is not compatible with all Cricut machines. Make sure your machine is compatible before purchasing the press.
- When placing the design on the mug, ensure that only the unpatterned tabs are under the handle. It will keep the Infusible Ink image from being damaged.
- Make sure the walls of the mug cover the cut out the design when you close the handle of the Cricut mug press. Then, if you can still see some of your design, open the handle and rotate the mug until it is completely covered.
- The Cricut Mug Press is easy to use. You just close the handle and wait. A row of 5 indicators along the top of the machine will show your mug’s progress.
- The Cricut mug press will beep after 5-8 minutes to let you know the complete transfer process. The mug will be very hot, but the handle will stay cool. To remove the mug, hold the handle and lift it with one hand. Use the other hand to open the Cricut mug press lever. Place the mug on a heat-resistant surface and let it cool for about 15-20 minutes.
With the Cricut mug press, you can easily make custom mugs with any design you want. So whether you’re a busy crafter or just want an easy way to make a custom mug, the Cricut mug press is the perfect tool for the job!
Conclusion
With Cricut infusible inks you can make mugs with any design you want. Whether you use a pre-made design or create your own, the possibilities are endless! So get crafty and make your own custom mug today.
We are supported by our audience. When you purchase through links on our site, we may earn an affiliate commission at no extra cost to you.

 Best Mug Press Machine Reviews
 Cricut Mug Press vs Oven

 In What Way Can I Use The Cricut Mug Press?
Our newsletter
* We will never send you spam or share your email with third parties